Slump Mold
My plan for this project was to make a medium-sized plate, underglazed with a caterpillar design. After my first trial, the plate wasn't dry enough to remove from the mold and ripped. On my second try, I added cornstarch to combat this issue. I also let it dry longer and used the hairdryer. This time, the plate came off more easily, and I began underglazing. Unfortunately, I never found my project after it was fired.


Sgrafifto
My goal for this piece was to make a functional cat food bowl. I planned to start with a circular slab and attach another rectangular slab around the edges. This would create the wall of the bowl. After scoring and slipping this together, I underglazed the piece. Then, I dried the paint with a hairdryer and began to sketch my design with a signing tool. After I had made this light sketch, I went in and carved it out. After the bowl had been fired, I went in with clear glaze. I'm very proud of how this piece came out and enjoyed learning a new technique.
.jpeg)
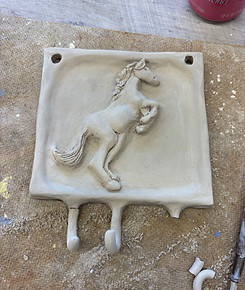
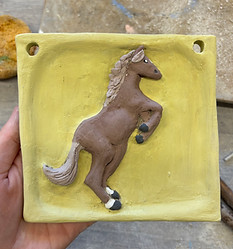
Relief Carving
My idea for this project was to create a coaster that could be given as a gift for the holidays. I began by rolling out my clay to make sure it was evenly flattened. Following this, I lightly sketched out my design with a signing tool. Once I was happy with the light sketch, I began to carve into the clay. I decided to underglaze this piece and painted the sun orange and the background yellow. On the back, I carved the year and a short message wishing the recipient a merry Christmas. The photo I've included to the right is only the most recent one I have and doesn't include color or clear glaze, as my piece is currently in the kiln.

Coil Building
My plan for this piece was to create a shallow bowl that could be used to hold jewelry or simply as decoration. On my first try, the coils were much too thin, and I hadn't slipped and scored them properly. Due to this, it fell apart when I tried to remove it from the bowl. On my second try, I used a thin plastic bag to sit between the clay and the mold. This helped with sticking when I removed it later. I also smoothed the inside of the bowl to ensure the coils were properly connected. I glazed this piece with mid-fire glaze, and I'm currently waiting for it to come out of the kiln.


Slab with darts
My goal for this project was to make a small mug that could be given as a gift for the holidays. I began by rolling out a slab of clay. Then, I cut out one triangle and used it as a guide for the others. After scoring and slipping these together, I started to work on the handle. I wanted to make it interesting, but was unsure how to go about it. After looking on Pinterest for inspiration, I added a small spiral towards the bottom of the handle. Because it's so tightly wound, creating this spiral took two tries before I was satisfied with it. I glazed the piece with mid-fire, and overall I'm very proud of the way it turned out.

Choice
My idea for this piece was to create another holiday gift. I wanted to make a festive decoration and decided on a snowman. To make sure everything was hollow, I started by making three pinch pots, differing in size. Then, I cut a small circle into the bottom of each pot. I slipped and scored each one of these together before going in with more detail. If I had to change anything about this piece, I would add a hat to my snowman. The photo to the right is only the most recent, as my piece is currently in the kiln.

semester 1 final
I'm a paragraph. Click here to add your own text and edit me. It's easy.